One of the things that I've had to do for my re-purposing of the DB15 Stepper Motor controllers is to be able to reliably reprogram them. The early versions of the programmer consisted of just a wire harness with a DB-15 connector on one end, and leads that plugged into the headers on a standard Arduino board. It eventually progressed into an octopus-like wire harness that used another DB15 as the "host" Arduino. This worked well, but is cumbersome. In this post, I'll highlight the basic circuit used, and the procedure for using it, specifically for this controller board, but the techniques are applicable to other ATmega based micros as well.

The reason for doing all of this work. About 30 or so DB-15 widgets which can be repurposed as Arduino-compatible microcontroller boards. They don't have all of the IO that a stock Arduino board has, but if your device only needs 6 IO (one of which is analog input), with a potential for another analog input, and 4 more digital outputs with a little work, they're an excellent free resource at Interlock!
The ICSP (In-Circuit Serial Programmer) is basically a device that takes in a firmware image from a host computer, and uses SPI-based communications with a target device to shove that firmware image into place. For general Arduino use, you can shove the Arduino serial bootloader into place. This is about 1k (for the optimized bootloader aka "Optiboot") of program space that sits on your micro, next to any sketch that you download to it. When the Arduino powers up or gets reset, this small bit of code will check for a new sketch to download. If it sees something, it will accept it, shove it into program memory and then run it. If it doesn't, it simply skips over and runs whatever sketch has already been downloaded there.
The ICSP allows you to program in that bootloader. You can also use it to program in your sketch, if you need to reclaim that 1kbyte of space. I'll get into that later on.
Okay. Let's get into the hardware for a moment.
Host Connection.
Showing the basic construction for the Arduino-ICSP Host.
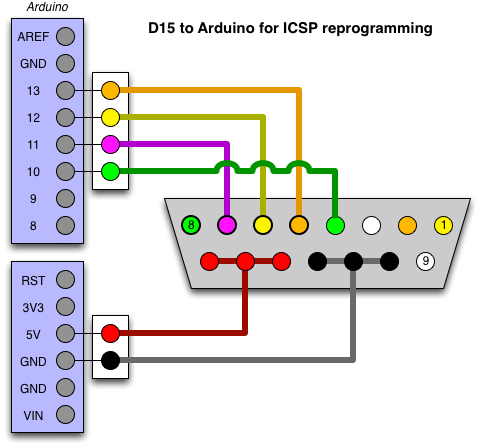
Target connection.
Showing how to hook up the D15 to the programming header above. These 6 lines can also be arranged in the 2x3 layout standard on Arduino boards as well, or wired directly to ATMega chips for other applications.
On the Arduino, the pins are mapped as such:
- Digital 13: SCLK (Orange)
- Digital 12: MISO (Yellow)
- Digital 11: MOSI (Violet)
- Digital 10: SS (Green) (Wired to RESET for the programmer, DB15 pin 4)
The circuit to wire up is pretty easy. On the host, there are three status LEDs that the packed-in "ArduinoISP" uses. Heartbeat shows you it's alive, Programming shows you when it's programming a target device, and Error tells you when something went wrong -- which is also displayed on the host computer.
These three output should be wired through a 220 ohm resistor, to a LED, and tied to ground.
One other thing that may be necessary is to disable the reset circuit on the host Arduino. This is necessary because when the computer connects to the host Arduino-programmer, that micro will reset, and then quickly hop into the "check for new firmware over serial for itself" routine, as explained above. This may often cause failures with the host computer connecting and communicating with the programmer properly. If you disable the reset circuit here, it will never fall into this state, and will remain perfectly stable. The easiest way to disable it, if you're building it up from scratch, is to disconnect the DTR/Serial based reset trigger completely, leaving the 10k pullup resistor tied to the arduino's reset line. However, if you're using a pre-constructed Arduino as the host, you can simply tie the reset line to +5v through a 120 ohm resistor.
Connecting the host to the target is also easy. The target device should be hooked up as a basic arduino -- power, crystal clock, etc. Be sure that even if they're on separate power supplies, that they at least have their grounds tied together. For ease of use, just power the target from the host completely. Past that, simply connect up pins 11, 12, 13 from the host to the target device. This will put both on the same SPI bus. This is how the data will get sent to the target device. Basically, this maps out as SPI-MISO, SPI-MOSI, and SPI-CLOCK. The only other connection you need to do is to hook up pin 10 from the host computer through to the RESET line of the target.
Step 1: hook up power, ground, serial IO, and reset circuitry.
The reset circuit is a 10k pullup resistor to +5v, and a .1uF cap to the reset line.
Next up will be putting a jumper to disable the reset line as explained above.
(Note: this picture is from a different build but shows the same first step)
The DB15 as seen here has pin 1 on the right. The pins are basically: 1) TX, 2) RX, 4) RESET, then +5 and ground on the bottom pins.
The Red LED is the power indicator. The resistor and cap for the reset circuit are visible, as is the jumper for disabling reset on the ICSP widget.
Above you can see the version of this board that I fabbed up for Interlock. It has the FTDI header for connecting to the host computer, and used a pre-programmed DB-15 widget with the ICSP firmware on it. I know this sounds like a chicken-and-egg thing, but once you program your first device using a standard Arduino as the host, it makes sense to program one of these, and use it to replace that board instead. (especially when you have ~100 of them to spare. hehe)
The blue/white/red/white lines from the ICSP widget are equivalent to pins 10,11,12,13 on a standard host Arduino, and those go right into the cable down to the target device. Since pins 9, 8, and 7 were not all able to be broken out to the LEDs, I had to tweak the sketch a little. 8 is the LED on the ICSP widget itself, which is Yellow. The Yellow and Green LEDs on the board (along with their current limiting resistors) are wired up to Analog 2 and Digital 3 (pwm), and these ports are changed accordingly. 8 remains as the error LED, 3 became the green Heartbeat light, and A2 became the new yellow program light.
Ready to roll, with a target device plugged in!
Note the extra prototyping area. This can be for a ZIF socket in the future for other devices, etc.
The full circuit diagram for the D15-hosted programmer, connected to a D15 target.
(The wire colors are the same as the above for reference.)
Once this is all wired up, we can get some firmware down onto that thing. In our case, we have a device that isn't directly supported by the Arduino IDE, so we need to configure that first.
Two things need to be installed. First is the board definition, second is the optiboot hex file. Both of these content files can be grabbed from my
Geodesic Sphere repository. Full instructions are also there as for specific directories on Windows and Mac for doing this installation. The "readme" there shows the text block to drop into your "Boards.txt" file, and where to find that file. You will also need to drop the optiboot.hex file into the "optiboot" folder as well. Once these two steps are done, you can start up the Arduino IDE and you're ready to program. Let's also assume that we've already externally kickstarted this, and the "Arduino ISP" sketch is already on the host device, and is running properly.
Here's where it gets confusing. What? You're not already confused? HERE WE GO!
Fire up the Arduino IDE, and let's set it for the D15 device. From the "Tools" menu, select "Serial Port" and select your FTDI interface's serial port name. Next, from the "Tools" menu, select "ATmega168 at 7372800Hz (D15)" from the "Board" menu. This will tell the IDE what our target device is. Now, from the "Tools" menu, select "Arduino as ISP" from the "Programmer" menu. This is all one-time configuration stuff. Now, you can plug in a target D15 widget to the end of the cable seen above, and then select "Burn Bootloader" from the "Tools" menu. A bunch of lights should flash, and you'll end up with the Arduino bootloader on the target widget!
On the above setup, it's wired such that you can also use it to test the target. Disconnect the FTDI cable, disconnect the ICSP widget, and move the newly programmed device into the DB15 connector on the board. Adjust the jumper so that "RESET" is enabled. Now plug the DB15 cable back in. This is now the equivalent to using the DB15 as a barebones Arduino. Load up the D15_Test sketch included in the github repository mentioned above. Click the "upload" arrow button, wait a moment, and the LED on the target widget should be blinking. That's it!
One alternate way you can use this is to program your Arduino code onto the target widget without installing the bootloader. These widgets use an ATMega 168, which has very constrained space, so this might be preferred for larger programs.
Hook it back up in the programmer configuration, with the ICSP widget on the board, the target on the cable, and the jumper set to disable RESET.
From the Arduino IDE, instead of just clicking the "upload" arrow button, hold down the [SHIFT] key, and the text will change from "upload" to "upload using programmer". It may take a moment longer, but the end result is that you will see the LED blinking on the target widget.
You can use this to program other Arduino-like devices too (ATMega, ATTiny, etc). You will just need to breakout the 6 lines (MOSI, MISO, CLOCK, RESET, +5v, GROUND) to whatever pin header configuration or socket is necessary. Then you can just select the target device from the menu as appropriate (ATmega 168, 328, 5v, 3.3v, etc) and then select "Burn Bootloader" from the menus as above, and it will put the appropriate serial bootloader onto the device for you.