Press 'I' (uppercase) to pick a different image, 'G' and 'g' to change grid mode and settings, drag the mouse to move around in the image, and shift-drag to adjust the size of the grid.
I made it in Processing 3.3.1, in "JavaScript Mode". When I got to this point, i just copied the entire directory to umlautllama.com, and there it is!
I've been working on upgrading my RC2014 Z80 computer for the past few months, but in a very low-impact-to-my-finances-that-can't-support-it-otherwise way. This post will just go into explaining a few of the upgrades I have in mind,
First of all, my current hardware scheme, the "RC2014/LL MicroLlama" as I call it, is and has been fully functional in its current state, and is emulated well in my emulator.
I started working on a mass-storage solution for the MicroLlama, which I have slightly back-burnered this month so that I could attempt to focus on the 2017-04 RetroChallenge ("The Andy Project"), but I'll likely pick it up again next month, especially with some of the upgrades I now have in my hands, which I will now briefly talk about...
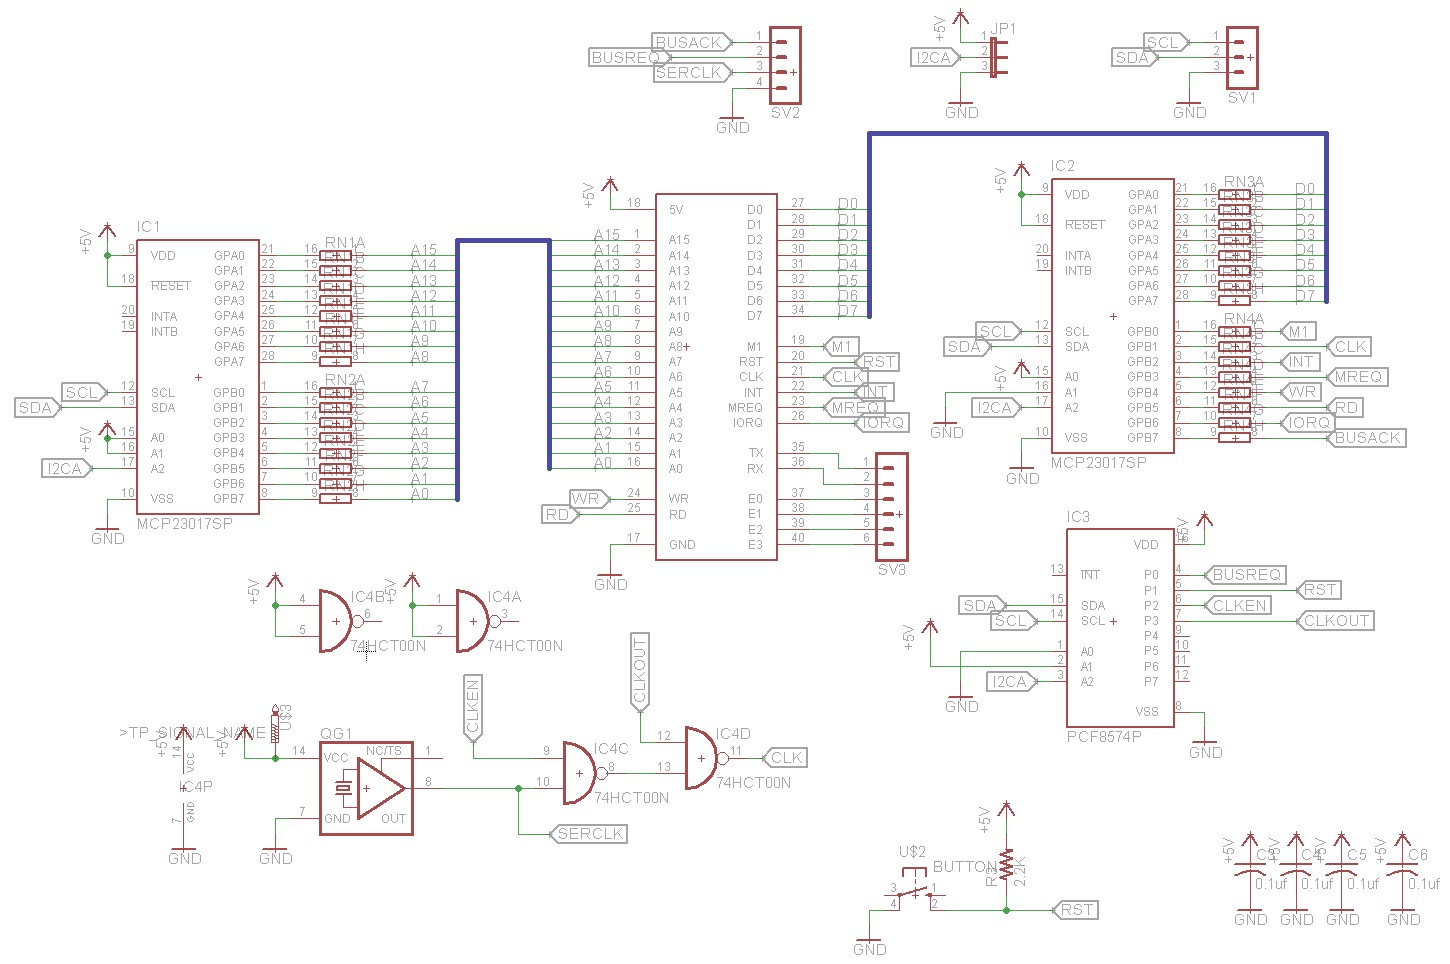
The short description of this is that it has some I2C I/O Expanders that sit on the entire bus (Data, Address, Control) as well as replaces the system's 7.37 Mhz clock board. This can be used to snoop on the system, read/write IO, read/write RAM, etc... taken one level above that, you can use SMB's python scripts to upload data right into RAM, thus eliminating the need for a ROM module.
People have successfully used this to run 64k RAM-only RC2014 computers, and upload the program ROM from their Raspberry Pi. (Schematic, GitHub link to software)
It took me about 15 minutes to figure out the orientation of that crystal.
(Pin 1, the pointy corner, is in the bottom right)
Also, I'm not sure the jumper configuration is correct yet.
That's where my personal problem with it comes in. As it stands, his project uses a RasPi to communicate with the board over I2C. This is fine, however it does not fit within my workflow.
I do not really have a RasPi to use for dev work, so my solution is to take a tiny Arduino Leonardo clone ("Micro-SS" like this one), with a cable connecting its I2C lines to the Bus Supervisor Board. Then, I'll make a thin Serial-I2C bit of software and making some desktop tools, perhaps in python to fit with the original from SMB.
My "proof of concept" for USB-I2C communications.
Here it's connected to an RGB color sensor.
The end result is that in my Z80 project makefiles, i can add a target for the generated .HEX files to be downloaded directly to the physical RC2014.
I've made a cable for my Micro-SS and have built my Bus Supervisor Board. As you can see in the photo, this is it set up on a powered RC2014 backplane with only the standard IO module, and a few LEDs on a few data lines, so that I can test out everything before putting the CPU and RAM on there, potentially damaging them.
Obviously, it would also be possible to include a couple of ROM programs directly into the MicroSS, and possibly store a small one in the ATmega 32u4's EEprom as well. Some buttons on the MicroSS could be used for injeting these pre-stored programs. i could even see a program that generates a menu that the arduino can basically farm out to the Z80 to get user responses/menu options, etc.
Additionally, I can make a RC2014 bus - to - pac-man bus adapter, and actually deploy code-in-development directly to the machine from my desktop from the makefile/build scripts. ... This is a dev tool I've wanted for about 20 years now!
Lots of possibilities!
I will put out another blog post and a github link for the supporting software, when I've got this working. (estimated - mid next month)
64k RAM and Pageable ROM
I also received this past month the boards for these two official RC2014 boards: the 64k RAM and Pageable ROM. As you can see in the pic, i still need to order quite a bit to make these work. Now that I have the Bus Supervisor board, the Pageable ROM is less interesting to my needs, although I may still adapt my RC2014/LL design to use these pieces instead.
You can see pics of these in the top of this blog post.
The 64k RAM will definitely work well with the Bus Supervisor board, however the Pageable ROM board has definitely taken a bit of a slip down my plate... Until I can get the parts in for the RAM (sockets, etc) I can use my existing unmodified 32k RAM board for the upper segment of memory ($8000-$FFFF) and my slightly modified second 32k RAM board for the lower segment of memory, I just have to manually enable it for read/write.
Just an update to show some progress on the project.
This project is to reproduce a near-pixel-perfect reproduction of a few of Andy Warhol's pieces that he created on the Amiga 1000 back in the 1985 timeframe, on native tools.
We're 12 days in, and I do not have any completed images to show y'all. But don't be fooled into thinking I haven't done anything! I've been running a timelapse of the entire process, and here's the segment for the tool setup work:
Here's a summary of the tasks done so far, and the direction I'm going.
Graphic editor tools
First of all I did a kind of survey of a few tools to figure out what would work best. I had originally thought that I would use the pre-release GraphiCraft to generate the files, however I ran into a few snags. This software crashes. A lot. More importantly, it does not have the "save" function implemented. It DOES however have something very important... Andy's works used some of the pattern flood fills that GraphiCraft (nee ProPaint) used. These were removed before GraphiCraft was actually released. But I'm getting ahead of myself here. My feeling is that with this project, GraphiCraft will only be used to generate more sample and reference materials. Mainly the fill patterns and how they are aligned, as well as the color palette, which seems to be untouched for many of Andy's pieces.
I have three versions of GraphiCraft here. I have a pre-release version on a "v29 DOS" disk. This is the one with patterns, correct palette, is unstable, and cannot save. I also have two disks labelled "GraphiCraft 1.1" and "GraphiCraft 1.2". As far as I can tell, the applications are the same, but one is on a Workbench 1.1 bootable disk, while the other is on a Workbench 1.2 bootable disk. For some starting points of GraphiCraft images, I'll use this to generate the file, and perhaps I'll use them as the final save step, so that we get GraphiCraft /ProPaint ILBM files instead of DPaint ILBM files.
I have also settled on Deluxe Paint III for the main amount of the work. 1 and 2 are fine, but 3 just feels more stable and complete, at least with my 30+ years of experience with the Deluxe Paints... Deluxes Paint? hmm. DPaint 4 would work as well, but I've never really gotten completely used to/comfortable with it.
Slideshow tool
I also looked around a bit for a slideshow application. I want the end product to be a bootable ADF that can be dropped onto a 1.3 system, or perhaps on an AROS-replacement-kick system. I wanted to use a program where I could just script it easily, without having to fire up a gui to add in or replace files. So tools that were out included AmigaVision (2.x+), Deluxe Video (needs gui to make slides, palette limited anyway), and so on.
Early on, I was considering the "Slideshow" application that came with the "Deluxe Paint Art and Utilities" disk from Electronic Arts. I've used it quite a bit in the past, and it has exactly the type of "script it in a text file" interface that I want. However that one seems to not function on anything newer than AmigaDOS 1.1. There is an updated version of this on the "Impressionists" art disk also from Electronic Arts, but that one did not work with 1.3 either.
Anyway, this is the exact feature list I want, in bullet form:
Must run in AmigaDOS 1.3
Fade in/out to black
supports10-15 slides
supports 320x200 32 color IFF-ILBM image files
delay time while a slide is up
(optional) user input to advance to next slide
(optional) user input to exit from the slideshow
should not require loading a GUI to add files, tweak sequence
Here's a quick summary of some of the tools I've experimented with, and my thoughts. Some of them are from commercial products, some from Fred Fish disks, etc.
First: these were not suitable:
EA Slideshow (DPaint Arts & Utilites Disk) - requires AmigaDOS 1.1
EA Slideshow (The Impresisonists) - requires AmigaDOS 1.1
EA Deluxe Video - requires gui editing to edit/tweak slideshow, 16 color images
AmigaVision - requires gui editing, AmigaDOS 2.x+
PPShow - Don't remember why. ;) I think it was doing weird palette things.
Mostra - requires AmigaDOS 2.x (Aminet)
And these are potentials:
dpslide - okay, can't seem to exit (Fish disk 11)
slidemaster - okay as well (Fish disk 274)
Possibilities:
ALook - TBD
Show (Fish Disk 323) (early version of Mostra)
Mostra (early version on Fish Disk 330)
One person on Facebook had recommended a trick that some demo disks did, which was to set the system colors to all black, then images could be loaded one by one from a startup-sequence or the like. That's something I'll consider as well. (also, ref Fish Disk 323, "Color Tools")
One AmigaDOS reminder; to make a CLI script executable, you use the "protect" command line tool like so:
protect slidehowScript +s
AmigaDOS 1.3
All of this will be worked on in a virtual NTSC Amiga 1000 (or Amiga 500) provied by the FS-UAE emulator running on my Mac OSX laptop. I've set up a Workbench 1.3 filesystem disk, onto which I have installed the basic 1.3 system, Deluxe Paint III and GraphiCraft 1.2. This is honestly nothing too extravagant.
I set up a new FS-UAE config file with the specs:
NTSC chipset
512k chip (Amiga 500)
2 meg fast (not really necessary)
DH0: "WORK13:" is a filesystem-based hard drive, with a "Files" folder containing all the works-in-progress, and completed imagery
And I also set up a second config for obtaining and analyzing reference materials from GraphiCraft
ObeseBits
I discovered early on that it was going to be necessary to have some way to apply a grid to the reference images from the internet (PNG and JPEG images), so that I can recreate their content pixel-for-pixel. Since they had differetn scaling, different compression and in some cases, different pixel aspect ratios (non-square or stretched-to-square) pixels.
The Amiga in the modes that Andy used had non-square pixels. Well, the representation on disk was a 4:3 display of a 320x200 pixel image. This means that each pixel is slightly rectangular at 1.1:1 or something like that. However, when they are displayed on an Amiga monitor or TV set, they are displayed-as-square. This sounds confusing, but rest assured, it really is.
The tool that I eventually made, "ObeseBits" (the name is a play on the MacPaint magnifyer tool which it called "FatBits", but it's for much larger images. see?) has been made using the "Processing" development environment. I used the most recent "Processing v3.3" to create it, using the "p5.js" JavaScript mode. That way I could just run it in any browser without the need to install Java.
As I worked on it this past week, I rolled in a bunch of features which I figured would be useful for this project:
Load in any image (scaled most images to 2xxx by 15xxx pixels for consistency)
Show the image zoomed in (4x zoom defined in the code, nonadjustable)
Grid is applied over the displayed image
Grid has selectable white/black/yellow color with a few levels of opacity
Grid has slightly bolder 5th lines, making 5x5 grid of pixels
left-click drag to move the target zoom area around
shift left-click drag to adjust the grid spacing/scale
Scaled down to 160x100 thumbnail showing where the zoom area is in the "big picture"
display of the current pixel color under the mouse
After using this tool on the same machine as the emulation for an evening, I've determined that it will be substantially more efficient to run this tool on a second computer, and dedicate the primary computer purely for the emulation environment.
Current State...
After the weekend, I've created the following content, using the above tools to be detailed in an upcoming blog post:
GraphiCraft reference image
320x200 IFF ILBM image
Created from observations, documentation from GraphiCraft v27r6
Recreated in Deluxe Paint III
32 colors with the exact palette from v27r6
"purple balls" pattern reproduced with exact pattern-grid alignment
"Campbells" image started
Started with the reference image above, kept the palette and header bar
Some of the top of the can is converted.
A Minor Dilemma...
I am caught in a dilemma of sorts though that I need to figure out at some point...
Andy did a lot of his work in ProPaint, which was the original name for GraphiCraft. This can be seen on the video on youtube where he is capturing and editing a picture of Debbie Harry. The header bar says "ProPaint V27 Release 14". All of the released images from the recent effort show "GraphiCraft v27 Release 6"... Which is correct? My gut is telling me that the software that he used, specifically, on that day for the presentation, it put that text atop the screen. Perhaps that was the exact text on his copies as well. I can only assume that the restoration team was using the software they had, not necessarily the specific application disks Andy was using... although I could be wrong. I am trying to get into contact with them to determine exactly what is going on there.
For now, I'll stick with the GraphiCraft heading. ;)


