Friday, November 19, 2021

Rochester Maker Faire 2021 - Exhibit info!

Welcome! If you're here you either from using the QR code I had at Maker Faire, follow me as @yorgle on twitter, or perhaps from my YouTube channel ... regardless... welcome!  This is my project blog thing and I post info about all of the esoteric and weird things I work on here.

This post is meant to provide more information to you about all of the projects involved.  Follow this blog for more updates about these projects; links to videos, source code, etc.


Projection Mapping

For this, I got inspiration from this video on YouTube where they played this video of the Happily Ever After fireworks show at Walt Disney World onto a Lego model of "The Disney Castle".  It came out awesome, and I wanted to do something similar.

While I'd love to have that Lego set, I don't have any place to put it, and on top of that, I don't have $350 to spend on it... however, Lego released the much more budget-friendly Mini Disney Castle which sells for $35 and still has some excellent details and even comes with a Mickey minifig!  I used this as my starting point.

I dug out my Dell short-throw 1080p DLP projector, and projected it onto the castle.  It didn't match up perfectly, which I had expected.  I bought a second Lego Mini Disney Castle for parts, and made a bunch of modifications to the model to add a few small spires, adjust heights and proportions.

Then I built a base using some gray rocks made out of Lego, to line it up perfectly with the projector.

For MakerFaire, I also made a projection screen to set up behind it.  For this I used some 1/2" PVC pipe and fittings, and made space for a roughly 2x3 foot screen.  For the screen itself, I used about a yard light-blocking fabric from Joann Fabrics for about $8.  The fabric I picked out was tan, with a white backing. I'm using the white backing side for the screen.  The main criteria I was looking for in a fabric was something with as little surface texture and depth as possible. I think this material choice was a great find!


Lighting Effects for Lego Models

I've loved the idea of using small vignettes to display my favorite minifigs, and I was super happy to find instructions from @benbuildslego to build a super tiny Cinderella Castle, long before the "Mini Disney Castle" was released. I highly recommend his instructions.  And I have no plans to make a tiny projection mapped version onto this model. Lol.  Anyway, one of the other instructions of his that I ordered included my favorite geodesic sphere in the world... Spaceship Earth from EPCOT.  (aka "that big golf ball thing").

I thought it would be great to light it up just like the real thing, so that's what I did.

I built up his design, but I added some supports around the edge for some Technic pieces to support some lights.  I also 3D printed some Technic-compatible holders that I used to mount some of these tiny NeoPixels into.  I designed the element so that the lights can be adjusted and pointed exactly where I wanted them to go.

The NeoPixels are wired together using some kynar/wire wrap wire so that I could be sure it could be routed well, and not be too obvious.  All of this is wired back to an Arduino to control it all.  Any model of Arduino (Uno, Leonardo,  Mega, etc) would work, but I used a "SS Micro" as I had an extra one and I love the formfactor of it.

The code, soon to be available in Github, consists of a set series of "scenes", which the 10 Neo Pixels can display.  The scenes can be faded between, randomized in intensity so that they've got some life to them, and randomized in duration and sequence.  The code demonstrated just cycles through the four animated scenes forever.

The scenes are: 
  • "Night" - dark blue, as though it's just night time by itself
  • "Glow 1" - the wonderful color mix of orange, reds, gold and lavender
  • "Glow 2" - same as Glow 1, but roughly mirrored left-to-right for some variation
  • "Twinkle" - just like "night" but with a twinkle of cyan on the lights occasoinally
There's also two special lights; one for the obelisk/fountain in front of the sphere, and one for a spotlight on the Mickey minifig atop the sphere. These operate externally to the animation sequences described above.


Monday, November 1, 2021

Handheld RC2014 System (RetroChallenge (sorta))

One of the great things about making stuff is that you can make stuff that doesn't yet, or shouldn't exist.  

I honestly didn't get anything done on my RC2014 projects for RetroChallenge this year, other than an idea, and some 3D printed stuff within the final few days of the month.

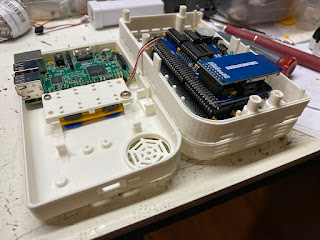
I've had it in my head for a while to make a gameboy formfactor RasPi system for a while now, even though I already have a portable Pi emulation system in my Atari Lynx enclosure.  So I found a model for the "super retropipod" enclosure on Thingiverse and printed it out, and ordered and then modified a 3.5" lcd and shoved it all into the case.


I decided i didn't want to make a PCB or hack up a perfboard to support tact switches, and I had a bunch of largeish 12mm tact switches, so I modeled and 3d printed mounting boards for those too.


Then I had an awesome-horrible idea.  I would mount a RC2014 inside the enclosure as well!  If I managed to make the enclosure a little thicker (about 1cm) I could easily fit a RC2014 mini or micro inside the case along with the pi and all of its fun stuff.  I could even probably also fit in the TMS9918A video card piggybacked onto it inside the enclosure.  So I modeled and printed out the thickness extension too!

Long story short, I have the beginnings of my ultimate multipurpose Pi/RC2014/Llichen-80 handheld!  And she's a chonky beast too!

I modeled and printed a piece to sandwich between the layers of the "pi-boy" enclosure I printed, and added a space for a nice switch for power on the side.  I still need to wire it all up, but I'm on my way to having this thing be AWESOME!  

Although I still want to make a "tall-boy" at some point... take two GB DMG enclosures, and extend the screen space to be taller, and put in a rotated, vertical monitor in the space there.  eg, use a 4" or 5" lcd in portrait instead of a 3.5" in landscape...


Next actions on this project:

  • Wire up the buttons to the GPIO header
  • Wire up the LED on the front panel to the GPIO header
  • figure out a power solution for the system (batteries, recharging, etc)
  • Mounting solution for RC2014 inside the enclosure without it moving around
  • Make a 2-board backplane for the RC2014 so I can also have the TMS board internally
  • Wire the TMS to the monitor too, and figure out a quick way to switch inputs... perhaps two NC momentary buttons that disconnect the monitor from each of the two inputs, so it will auto-switch to the other input. (or short the input to ground via 75Ω resistor?)
Links: